The landscape of software development is undergoing a revolutionary shift with the advent of AI software engineers like Devin AI and Loveable. These innovative systems promise to transform natural language prompts into fully functional software applications, streamlining the development process like never before. This article details a hands-on approach to building your own end-to-end agentic AI project, nicknamed “Coder Buddy,” capable of generating web applications such as calculators or to-do lists from simple text commands.
The Vision Behind Coder Buddy
Imagine giving an AI a prompt like “create a calculator web application,” and within moments, it delivers a complete, executable application with all its underlying code. This is the core functionality of Coder Buddy. While not as sophisticated as commercial-grade solutions, this project serves as an excellent learning platform for developing agentic AI skills, offering a robust addition to any technical resume.
The project leverages a modern tech stack: langchain for orchestrating the AI agents, langgraph for defining the multi-agent workflow, Groq for cost-effective LLM inference (using open-source GPT models), and PyCharm as the integrated development environment, benefiting from its advanced AI-powered features like AI Playground and AI Agentic Debugger.
Understanding the Agentic AI Workflow
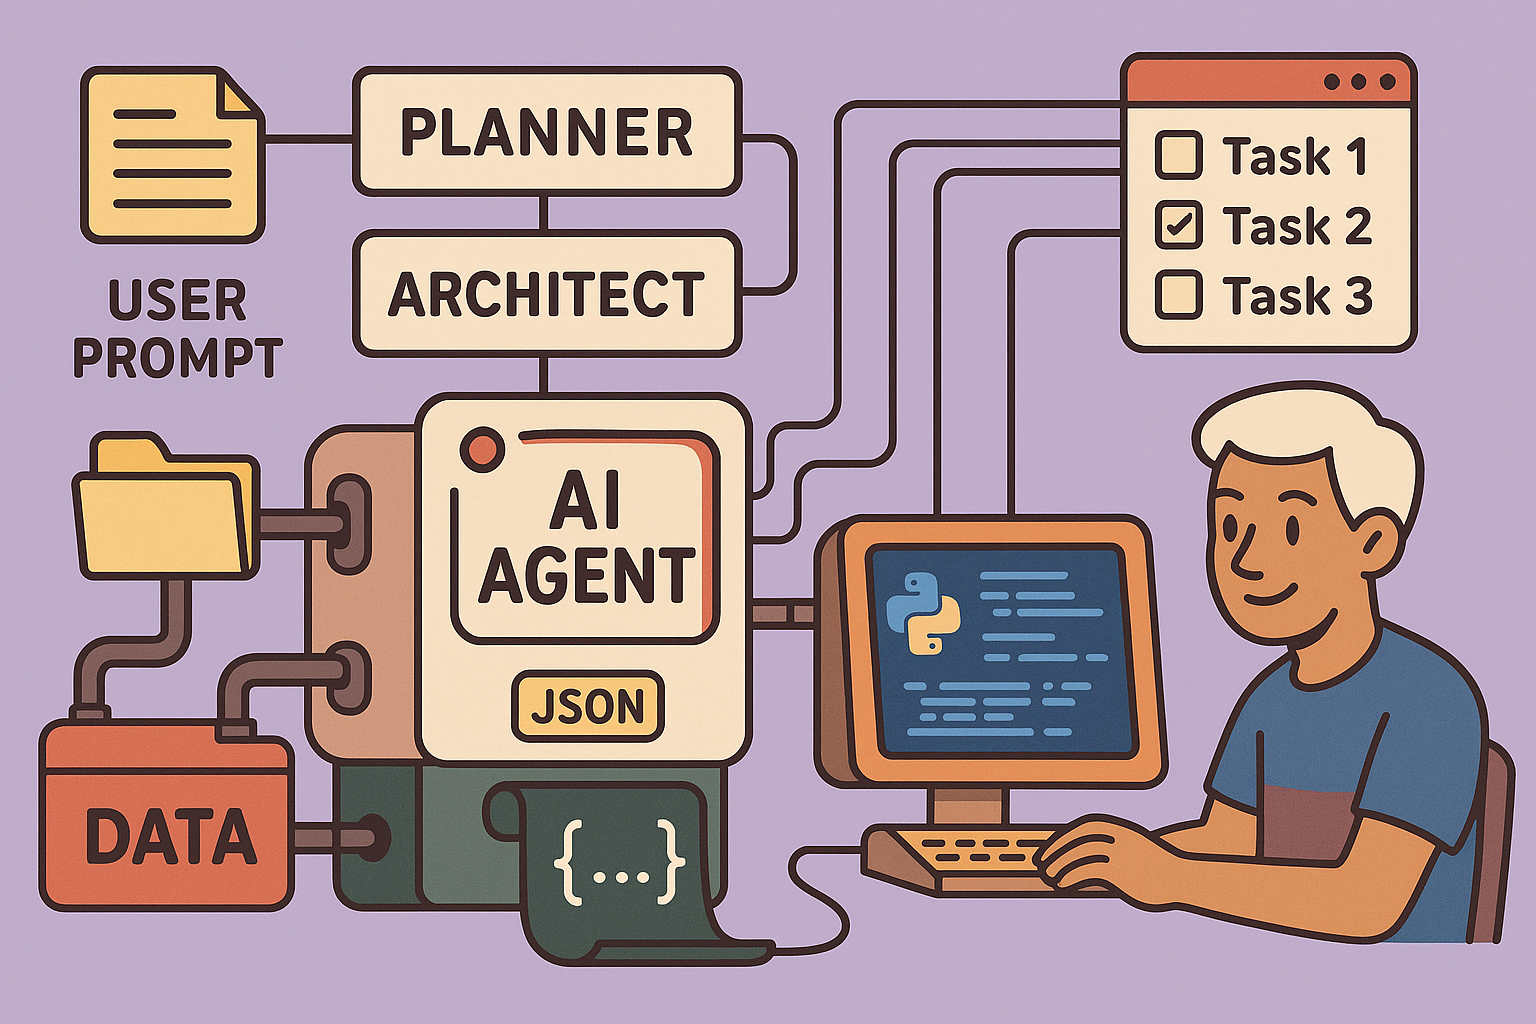
At the heart of Coder Buddy is a multi-agent system, mimicking the collaborative phases of human software development. The process is broken down into three main stages, each managed by a specialized AI agent:
1. The Planner Agent
Just as a human software engineer would, the first step is always planning. The Planner Agent takes the initial user prompt (e.g., “create a calculator web application”) and transforms it into a detailed engineering project plan. This plan includes:
- App Name and Description: A clear definition of the application to be built.
- Tech Stack: Identification of necessary technologies (e.g., HTML, CSS, JavaScript).
- Features (Jira Stories): A comprehensive list of functionalities the application must possess. For a calculator, this would include basic arithmetic operations, clear/backspace functions, responsive design, etc.
- File Structure: A preliminary outline of the files needed and their respective purposes (e.g.,
index.htmlfor UI structure,style.cssfor visual design,app.jsfor logic).
This agent acts as the project manager, breaking down the high-level request into actionable components.
2. The Architect Agent
Once the plan is established, the Architect Agent refines it by providing implementation details for each file and feature. Think of the Architect as a senior developer or technical lead, “spoon-feeding” precise instructions to a junior programmer (in this case, the Coder Agent). For example, for index.html, the Architect would specify:
- “Add
doctype htmldeclaration.” - “Link
style.cssin the<head>section.” - “Include
script.jsat the end of the<body>.” - Detailed guidelines for button layouts, display areas, and other UI elements.
This stage ensures that every part of the application has a clear, actionable set of steps, providing explainability and traceability should any issues arise.
3. The Coder Agent
The Coder Agent is where the magic happens. Taking the detailed instructions from the Architect, this agent writes the actual code. It iteratively goes through each task description, generating the corresponding HTML, CSS, or JavaScript. The Coder Agent is equipped with “tools” to interact with the file system – reading existing files, writing new ones, and listing directory contents – much like a human developer uses a code editor and terminal.
The Coder Agent’s process involves a loop: it picks a task, writes the code, saves it to the appropriate file, and then moves to the next task. This continues until all implementation steps are completed, at which point the agent signals “done,” and the graph execution ends.
Step-by-Step Implementation Guide
Follow these steps to set up and run your Coder Buddy project:
1. Initial Setup and Environment
- Create Project Folder: Begin by creating a dedicated folder for your project (e.g.,
app_builder). - Install
uv:uvis a super-fast Python package manager that replacespip. Install it usingcurl -LsSf https://astral.sh/uv/install.sh | sh(Linux/macOS) or refer to theuvdocumentation for Windows. - Initialize Project with
uv: Navigate into your project folder and runuv init. This creates a basicmain.pyandpyproject.tomlfile. - Open in PyCharm: Open the
app_builderfolder in PyCharm. Ensure PyCharm’s Python interpreter is configured to use thevenvenvironment created byuv. - Install PyCharm AI Agentic Debugger Plugin: Go to PyCharm Settings -> Plugins, search for “AI Agentic Debugger,” and install it. This plugin is indispensable for visualizing and debugging your AI agents’ internal states.
2. Configure Dependencies and API Key
- Add Dependencies: Copy the required dependencies (e.g.,
langchain,langgraph,pydantic,python-dotenv) into yourpyproject.tomlfile. A full list can be found in the project’s GitHub repository. - Install Dependencies: Run
uv syncin your terminal to install all listed dependencies. - Groq API Key:
- Go to
console.groq.comand log in. - Navigate to “API Keys” and generate a new API key.
- Create a
.envfile in your project root. - Add your Groq API key:
GROQ_API_KEY="your_api_key_here". - In your
main.pyor relevant script, importload_dotenvfromdotenvand callload_dotenv()to load the API key into your environment.
- Go to
3. Project Structure
Organize your project for clarity and modularity:
main.py: Entry point for user input and agent invocation.agent/: Directory to house agent-related code.graph.py: Defines thelanggraphworkflow (nodes, edges, state transitions).prompts.py: Stores all LLM prompts for different agents.states.py: Defines Pydantic models for managing the state passed between agents.tools.py: Contains utility functions (tools) for agents, such as file read/write operations.
4. Implementing the Agents
a. LLM Integration and Structured Output:
- Use
ChatGroqfromlangchain_groqto interact with Groq’s LLMs (e.g.,llama3-8b-8192). - Crucially, leverage
llm.with_structured_output()to enforce a specific output schema (defined using Pydantic models) from the LLM. This ensures consistent, machine-readable output for downstream processing.
b. Planner Agent (planner_agent function in graph.py):
- Takes
user_promptfrom the current state. - Uses a dedicated
planner_prompt(fromprompts.py) and passes it to the LLM with aPlanPydantic schema (fromstates.py). - Returns an updated state containing the detailed
plan.
c. Architect Agent (architect_agent function in graph.py):
- Receives the
planfrom the state (output of the Planner). - Uses an
architect_promptto generate detailedimplementation_stepsthrough the LLM. The output adheres to aTaskPlanPydantic schema. - The
TaskPlanincludes a list ofImplementationTaskobjects, each specifying afile_pathandtask_description.
d. Coder Agent (coder_agent function in graph.py):
- Tools Integration: Utilizes
create_react_agentfromlangchainalong with custom tools (write_file,read_file,list_filesfromtools.py). These tools allow the AI to interact with the file system. - Iterative Coding: Implements a loop:
- Retrieves
implementation_stepsfrom the state. - Processes one step at a time, using the
coder_system_promptand the specifictask_descriptionto instruct the LLM. - The LLM generates code, which is then written to the specified
file_pathusing thewrite_filetool. - Manages its internal state (
CoderStatePydantic model) by incrementing acurrent_step_index. - When all steps are complete, it updates the graph state to indicate “done,” allowing the
langgraphto transition to itsENDnode. Otherwise, it loops back to process the next task.
- Retrieves
- Guardrails: Implement
safe_pathchecks intools.pyto ensure the Coder Agent only writes files within a designatedgenerated_projectdirectory, preventing unintended modifications elsewhere.
5. Building the langgraph Workflow
- Initialize
StateGraphwith a dictionary-based state. - Add nodes for each agent:
planner,architect,coder. - Define edges to control workflow:
graph.add_edge("planner", "architect")graph.add_conditional_edges("coder", lambda state: state.get("coder_state").status, {"done": END, "coding": "coder"})(This creates a self-loop on “coder” until all tasks are done).
- Set the entry point:
graph.set_entry_point("planner"). - Compile the graph:
agent = graph.compile().
6. Execution and Debugging
- Invoke the agent with a user prompt:
agent.invoke({"user_prompt": "create a calculator web application"}). - AI Agentic Debugger: Use PyCharm’s AI Agentic Debugger to visualize the graph execution, inspect intermediate states, and trace the sequence of agent interactions. This is invaluable for understanding and troubleshooting your AI’s thought process.
- Verbose Output: Set
set_debug(True)andset_verbose(True)fromlangchain_core.globalsto get detailed console logs of LLM calls, token usage, and internal workings. - Resource Management: Be mindful of LLM token limits and rate limits, especially with free tiers. Consider upgrading to a paid plan on Groq or using other LLM providers for larger projects.
Showcasing the Results
Upon successful execution, Coder Buddy will create a generated_project directory containing all the application files (HTML, CSS, JS, and even a README.md file generated by the AI!). You can then open the index.html file in your browser to see your functional web application. Test it by generating both a calculator and a to-do app to observe Coder Buddy’s versatility.
Conclusion
Building an agentic AI software engineer is a complex but incredibly rewarding endeavor. This project demonstrates the core principles of multi-agent systems, LLM orchestration, structured output, and tool utilization. By following this guide, you will not only create a fascinating AI application but also gain profound insights into the future of software development. This “Coder Buddy” project vividly illustrates the power of AI to automate and accelerate creative tasks, making it a compelling addition to any portfolio.
🔍 Discover Kaptan Data Solutions — your partner for medical-physics data science & QA!
We're a French startup dedicated to building innovative web applications for medical physics, and quality assurance (QA).
Our mission: provide hospitals, cancer centers and dosimetry labs with powerful, intuitive and compliant tools that streamline beam-data acquisition, analysis and reporting.
🌐 Explore all our medical-physics services and tech updates
💻 Test our ready-to-use QA dashboards online
Our expertise covers:
🔬 Patient-specific dosimetry and image QA (EPID, portal dosimetry)
📈 Statistical Process Control (SPC) & anomaly detection for beam data
🤖 Automated QA workflows with n8n + AI agents (predictive maintenance)
📑 DICOM-RT / HL7 compliant reporting and audit trails
Leveraging advanced Python analytics and n8n orchestration, we help physicists automate routine QA, detect drifts early and generate regulatory-ready PDFs in one click.
Ready to boost treatment quality and uptime? Let’s discuss your linac challenges and design a tailor-made solution!
Get in touch to discuss your specific requirements and discover how our tailor-made solutions can help you unlock the value of your data, make informed decisions, and boost operational performance!
Comments