This guide details the process of building a full-stack bookkeeping application from the ground up, utilizing AI agents, specifically Claude Code, and several powerful MPC (Multi-agent Programming) servers. The application aims to automate expense tracking by processing bank statements and receipts with OCR, matching transactions, and providing a production-ready solution.
Project Overview: The Automated Bookkeeping Application
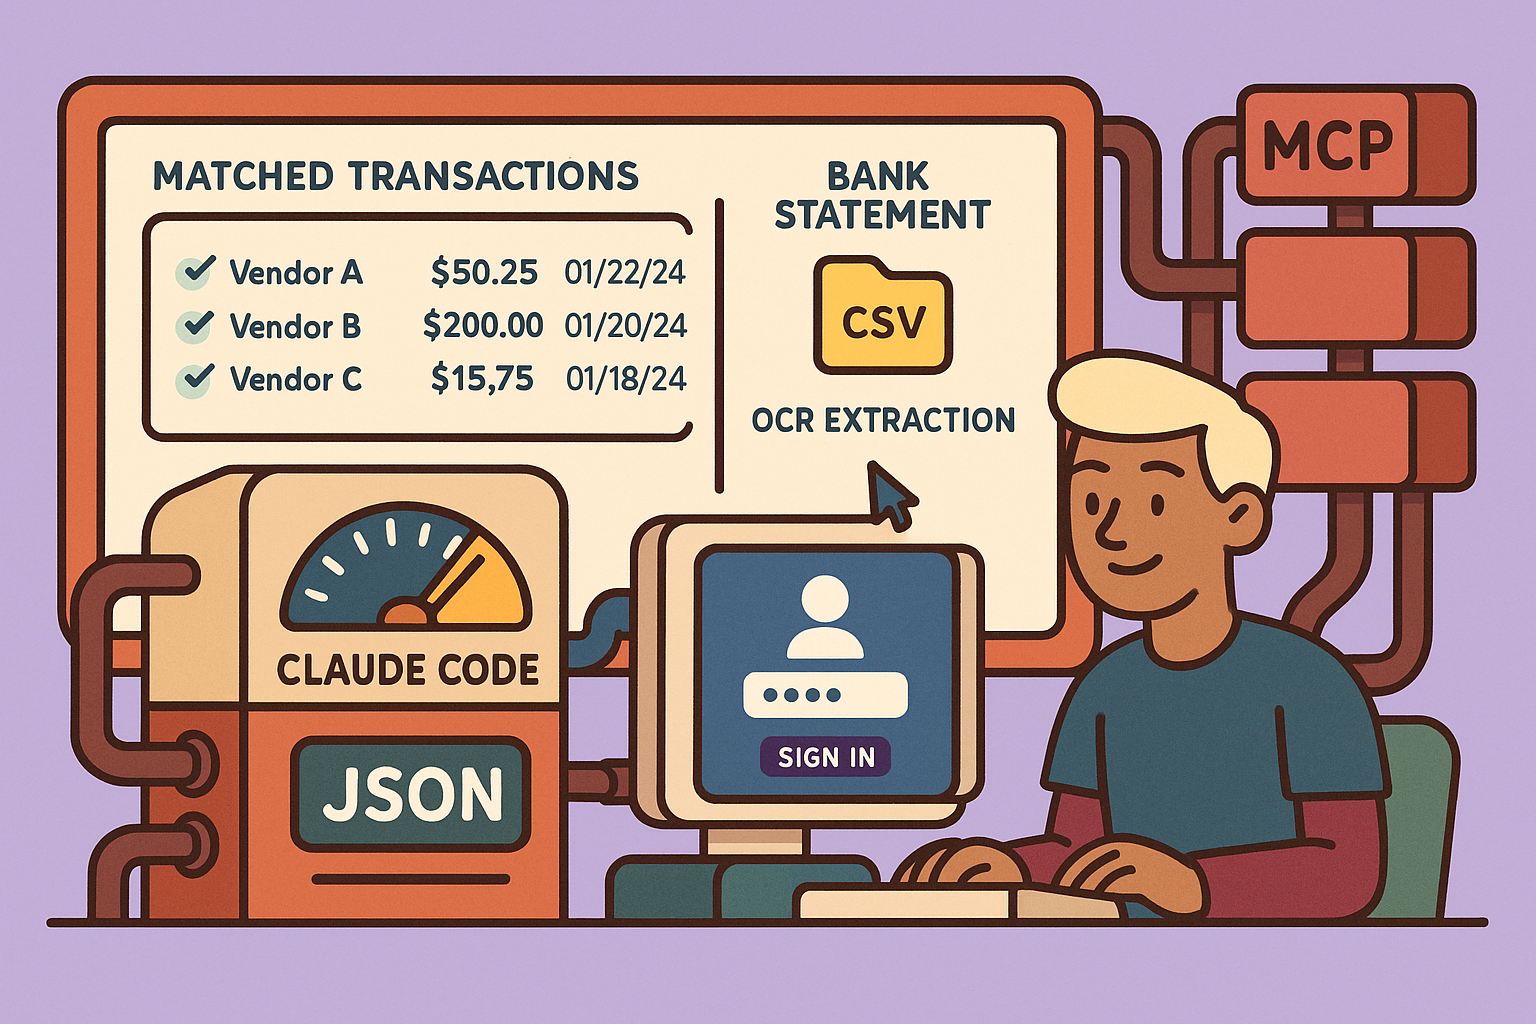
The core idea is to create an automated expense tracking application capable of extracting data from receipts and bank statements using Google OCR (Gemini 2.0 Flash) and then intelligently matching these transactions. The system architecture includes:
- Bank Statement Management: Users upload bank statements (PDF, CSV), which are broken down into individual transactions and stored in a
bank_transactionstable. The original files are stored in a storage bucket. - Receipt Management: Users upload receipts (images, PDFs). The OCR system extracts crucial data like purchase date, amount, vendor, and payment method, saving it to a
receiptstable. - User Authentication: Secure user sign-up and sign-in functionality using Supabase authentication.
- Transaction Matching: The most critical feature, automatically matching transactions from bank statements with corresponding receipts for comprehensive bookkeeping.
The application leverages AI for planning, coding, verification, and refinement, employing a process of prompt generation, MPC server integration, implementation, and testing.
Step-by-Step Development Process
1. Generating the Initial Prompt with AI
The process begins by crafting a detailed prompt using an AI assistant. This prompt, typically 200-300 words, outlines the application’s purpose, features, and desired technologies. Key elements include:
- Application Goal: Automated expense tracking.
- Features: Receipt and invoice management (JPEG, PNG), Google Gemini 2.0 Flash for OCR, Supabase for storage, user CRUD operations for receipts, bank statement management, transaction matching, and user authentication.
- Extraction Details: Specific fields to extract from receipts (e.g., last four digits of card, vendor, amount, taxes, purchase date) and bank statements (e.g., date, description, amount).
- Data Models: Description of database tables and their relationships.
- User Flow: How users interact with the application.
2. Installing and Configuring MPC Servers
Once the prompt is ready, the next step involves setting up several MPC servers. These servers empower AI agents to automate various development tasks.
a. Supabase MPC Server (Database and Storage)
Supabase serves as the application’s database and storage backend.
- Create Supabase Project: Sign up for Supabase and create a new project (e.g., “bookkeeper-AI”).
- Connect to Claude Code: In the Supabase project, navigate to the “Connect” section, select “MPC server,” and choose “Claude Code” as the client. Follow the provided
npm installcommand to add the Supabase MPC server to your Claude Code project. - Restart Claude Code & Authenticate: Restart your Claude Code MPC server. Run the
/mcpcommand in the terminal, select Supabase, and follow the authentication prompts to connect your Claude Code instance to your Supabase project.
b. Chassian MPC Server (UI Development)
Chassian is a UI library, and its MPC server helps in building beautiful and functional UI components.
- Install Chassian: Install the latest version of Chassian in your project.
- Initialize Chassian MPC Server: Configure the Chassian MPC server in your Claude Code setup (
npm installand configuration). - Verify Integration: Restart Claude Code and run
/mcpto confirm that Chassian is now listed among the connected MPC servers.
c. SpecKit MPC Server (Planning and Development)
SpecKit (from GitHub) is a specification-driven development kit that helps plan the entire application before implementation.
- Install SpecKit: Install the SpecKit MPC server using the provided
npm installcommand. - Initialize Project: Run
specify initin your project directory. Select Claude Code as the AI agent. - Define Constitution: Create a
constitutionfile to establish project principles (code quality, testing standards, user experience). - Generate Specification: Use the
specifycommand in Claude Code (e.g.,/specify <your_initial_AI_prompt>). Answer any clarifying questions posed by the AI to refine the project’s “what” and “why.” - Create Implementation Plan: Instruct the AI to create a comprehensive implementation plan, including a tech stack (e.g., NestJS 14 monorepo). This plan will break down the project into phases (e.g., database setup, authentication, receipts, bank statements, matching, dashboard, deployment) with estimated timelines.
- Generate Tasks: Use
spec kit tasksto break the implementation plan into actionable, executable tasks. Each phase will have a list of tasks.
3. Implementation with Claude Code
With the tasks generated by SpecKit, Claude Code can now proceed with implementation.
- Branching: Create a new feature branch for each phase or set of tasks.
- Execute Tasks: Use the
/implementationcommand in Claude Code, specifying the range of tasks to complete (e.g.,/implementation task 1 to 9). Claude Code will follow the task list, writing code, configuring dependencies, and setting up directories. - Supabase Integration: Claude Code, integrated with the Supabase MPC server, automatically creates database tables (e.g.,
receipts,bank_transactions) and configures schemas, relieving manual setup. - Credential Setup: Ensure all necessary API keys and credentials (e.g., Supabase service role key, Google API key) are configured in environment variables (e.g.,
.env.localfile). - Commit Changes: After each phase or significant task completion, commit changes to the GitHub repository.
- Iterate: Repeat the implementation process for all subsequent phases until all 137 tasks are marked as complete.
4. Testing and Verification with Playwright
Once implementation is complete, the Playwright MPC server is used for automated testing.
- Playwright MPC Server: Playwright opens a browser and executes test plans, validating UI components, user flows, and core functionalities.
- Report Generation: After testing, Playwright generates a report detailing successful and failed tests, enabling refinement of the application.
5. Deployment with Vercel
The final step is to deploy the application to a production environment.
- Vercel MPC Server: Integrate the Vercel MPC server with Claude Code.
- Deploy Application: Instruct Claude Code (using the Vercel MPC server) to deploy the application. Claude Code understands the application’s structure and dependencies, automating the CI/CD pipeline and deployment to Vercel.
- Verify Deployment: Access the deployed application through the provided Vercel URL to confirm it’s live and functional.
Key Features of the Completed Application
The resulting full-stack bookkeeping application includes:
- Dashboard: Displays an overview of expenses, total taxes paid, top vendors, recent activities, and data health (match percentages). It uses charts to visualize monthly spending.
- Receipts Tab: Shows all uploaded receipts with extracted data (vendor, category, amount, payment method) using Google OCR. Files are linked to the Supabase storage bucket.
- Transactions Tab: Displays bank statement transactions, sortable by date and amount. Original CSV files are linked for viewing. Includes a status indicator for matched/unmatched transactions.
- Transaction Matching: Automatically matches bank transactions with receipts, showing confidence scores. Users can view matched documents side-by-side.
- Data Export: Allows users to export matched records as a CSV file, providing full control and ownership of their financial data.
- User Authentication: Secure sign-in/sign-out functionality.
- Database: Supabase hosts
bank_transactionsandreceiptstables, storing all extracted and processed data. - Storage: Supabase buckets store original receipt images and bank statement files.
This comprehensive approach, leveraging AI agents and specialized MPC servers, significantly streamlines the development process, from initial planning to production deployment, for complex full-stack applications.
🔍 Discover Kaptan Data Solutions — your partner for medical-physics data science & QA!
We're a French startup dedicated to building innovative web applications for medical physics, and quality assurance (QA).
Our mission: provide hospitals, cancer centers and dosimetry labs with powerful, intuitive and compliant tools that streamline beam-data acquisition, analysis and reporting.
🌐 Explore all our medical-physics services and tech updates
💻 Test our ready-to-use QA dashboards online
Our expertise covers:
🔬 Patient-specific dosimetry and image QA (EPID, portal dosimetry)
📈 Statistical Process Control (SPC) & anomaly detection for beam data
🤖 Automated QA workflows with n8n + AI agents (predictive maintenance)
📑 DICOM-RT / HL7 compliant reporting and audit trails
Leveraging advanced Python analytics and n8n orchestration, we help physicists automate routine QA, detect drifts early and generate regulatory-ready PDFs in one click.
Ready to boost treatment quality and uptime? Let’s discuss your linac challenges and design a tailor-made solution!
Get in touch to discuss your specific requirements and discover how our tailor-made solutions can help you unlock the value of your data, make informed decisions, and boost operational performance!
Comments