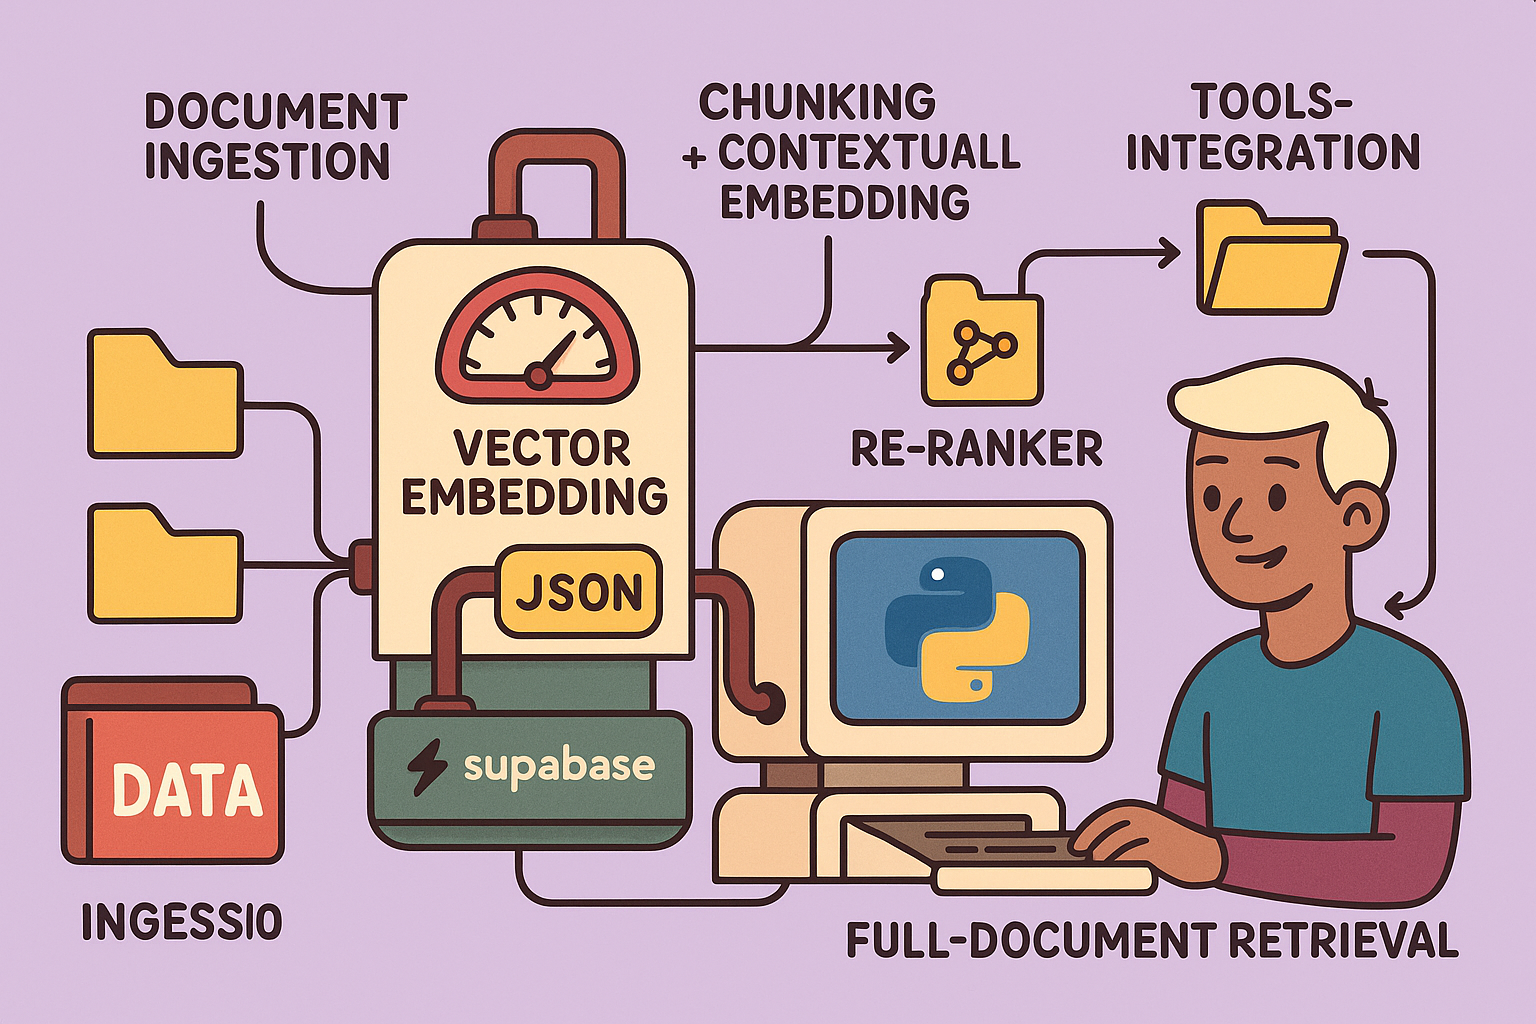
This detailed guide outlines how to build a highly accurate Retrieval-Augmented Generation (RAG) system using n8n, designed to transform your knowledge base into an intelligent AI assistant. This guide covers everything from setting up your vector database to implementing advanced RAG techniques like contextual embeddings and reranking, aiming for an impressive 98.1% response accuracy.
Understanding RAG: The Long-Term Memory for Your AI Agent
A RAG system acts as the long-term, deep memory for your AI agent. Unlike short-term memory (which handles immediate conversational context), RAG allows an AI to access and synthesize information from a vast knowledge base.
The RAG Process:
- User Query: A user sends a message to the AI agent.
- Embedding: An embedding model (not a typical LLM) converts the user’s text query into a numerical vector (a list of numbers).
- Retrieval: This vector is sent to a vector database, which finds the most relevant text “chunks” from its stored knowledge base by comparing numerical similarity.
- Augmentation: The retrieved chunks are combined with the original user query and the AI agent’s prompt.
- Generation: A traditional Large Language Model (LLM) processes this augmented information to generate a precise response, which is then returned to the user.
RAG has two main components:
- Feeding the RAG (Ingestion):
- Documents are broken down into small “chunks.”
- These chunks are transformed into numerical vectors using an embedding model.
- The vectors are stored in a vector database. The database groups semantically similar chunks together in the vector space, meaning chunks with similar meanings are represented by vectors that are numerically “close” to each other.
- Utilizing the RAG (Retrieval and Generation): This is the process described above, involving retrieval, augmentation, and generation.
Step-by-Step Implementation in n8n
This guide leverages n8n for workflow automation, Supabase for the vector database, and OpenAI for embedding and language models.
Step 1: Setting up Your Vector Database (Supabase)
Supabase offers a PostgreSQL database with a pgvector extension, effectively turning it into a vector database.
How to set it up:
- Create a Supabase Project:
- Go to Supabase and sign up for a free account.
- Create a new project. Give it a name (e.g., “RAG_n8n”), generate a strong password, and select a region (e.g., Europe).
- Wait for the project to be provisioned.
- Prepare the Database Schema:
- In your Supabase dashboard, navigate to the
SQL Editor. - Execute the following SQL script (provided in n8n documentation) to create the
documentstable, which will store your RAG data:
create extension if not exists vector; create table documents ( id uuid primary key default uuid_generate_v4(), content text, metadata jsonb, embedding vector(1536) ); -- This table is for document metadata (for advanced usage) create table file_metadata ( id text primary key, title text, url text ); - In your Supabase dashboard, navigate to the
- Configure n8n Connection to Supabase:
- In n8n, add a new credential for Supabase.
- You’ll need
Host,Service Role Secret, andAllowed HTTP Request Domains. - Host: Find this in your Supabase project settings under
Data API(it’s theURL). - Service Role Secret: Find this in
API SettingsunderProject Settings(calledService Role (secret)). - Allowed HTTP Request Domains: Leave this as
All. - Name your credential (e.g.,
RAGN8N).
- Configure n8n Connection to PostgreSQL (for Memory):
- Add a new credential for PostgreSQL.
- From Supabase, go to
Connect->Transaction Pooler. - Copy the
Host,Database name,User, andPassword(the one you generated when creating the project). - The
Portshould be6543. - Supabase will automatically create the chat history table for n8n when first accessed.
- Configure n8n Connection to OpenAI:
- Go to your OpenAI API dashboard, create a new secret key, and copy it.
- In n8n, create a new credential for OpenAI and paste your API key.
- Important: Ensure your OpenAI account has sufficient credit, as API calls incur costs.
Step 2: Ingesting Documents into RAG (Feeding the RAG)
This process involves fetching documents, processing them, and storing them in your Supabase vector database.
Workflow Overview:
- Triggers (Google Drive):
- Use two Google Drive triggers: one for
File createdand another forFile updatedin a specific folder (e.g., “RAG”). - Configure your Google Drive connection. (There are n8n shorts and tutorials available for this.)
- Use two Google Drive triggers: one for
- Loop & Conditional Processing:
- Use a
Loopnode to process files one by one. - An
IFnode checks theMIME typeto ensure only Google Docs (or your desired document types) are processed. For multiple types, use aSwitchnode.
- Use a
- Extract File ID:
- A
Setnode extracts the unique Google Doc ID from the file’s URL. This ID is crucial for managing updates.
- A
- Handle Document Updates (Deletion of Old Chunks):
- When a document is updated, the system first deletes older versions of its chunks from the vector database.
- A Supabase node with the
Deleteoperation is used, filtering by thefile_idstored in themetadatacolumn. - Set
Always Output Datatotrueto ensure the workflow proceeds even if no data is deleted. - Limit the output to 1 item to prevent processing old chunks multiple times.
- Download and Transform Document:
- An
HTTP Requestnode downloads the Google Doc as HTML. - A
Text Transformnode converts the HTML to Markdown, a format easily understood by LLMs.
- An
- Chunking and Embedding:
- A
Supabase Vector Storenode is used to add documents. - Embedding Model: Select an OpenAI embedding model like
text-embedding-3-small. Crucially, use the same embedding model consistently throughout your system. - Metadata: Use a
Default Data Loaderto includeID_fichier(file ID),Titre_fichier(file title), andURL_fichieras metadata. This allows the AI to reference the source document. - Text Splitter: Use a
Recursive Character Text Splitterto break the Markdown into chunks. Initially, a 1000-character chunk size is used. This can be improved in later steps.
- A
Step 3: Initial RAG Agent and Testing
With the initial RAG setup, your agent will be able to answer questions based on the ingested documents.
Prompt for the Agent:
“You are a personal assistant who helps answer questions using a document database. You must systematically consult the RAG knowledge base for any question, even if you think you know the answer. Never rely on your internal memory to provide information. Exclusively use documents from the database to answer user questions.”
Testing:
- Load some Google Docs (e.g., HR procedures, financial procedures) into your RAG folder.
- Start a chat with your n8n agent.
- Ask a question: “What is the name of my company?” (assuming this info is in your documents).
- The agent should correctly retrieve the information from the RAG and respond.
Step 4: Advanced RAG Part 1 - Contextual Embeddings
The basic chunking (every 1000 characters) can lead to incoherent chunks. Contextual embeddings significantly improve accuracy.
Method:
- Intelligent Chunking: Instead of fixed character chunks, use a Python script (or similar logic) within n8n to chunk documents by sections (e.g., titles) to maintain semantic coherence. This often results in chunks between 400 and 1000 characters (or similar ranges).
- Generate Context: For each chunk, send both the chunk and the full document to an LLM. Ask the LLM to generate a concise contextual summary of that chunk in relation to the entire document.
- Prompt Example: “Here is the fragment we wish to place in the context of the complete document: [FRAGMENT]. Here is the complete document: [DOCUMENT]. Please provide a short, concise context to situate this fragment within the global document to improve its retrieval during searches. Answer only with the concise context, nothing else.”
- Augment & Store: Concatenate the original chunk content with its generated context. Store this augmented content in the vector database.
- Adjust Chunk Size: Since context is added, increase the
chunk_sizein yourRecursive Character Text Splitter(e.g., from 1000 to 1400 characters) to accommodate the additional context.
Benefit: This method reduces the error rate from approximately 5.7% to 3.7%.
Step 5: Advanced RAG Part 2 - RAG with Tools (RAGentic)
Traditional RAG agents have a limited view; they only see the chunks retrieved from the vector database. RAGentic agents empower the LLM with additional tools to broaden its understanding.
Method:
- New Supabase Table for File Metadata:
- Create a new table in Supabase (
file_metadata) to store document names and URLs:
create table file_metadata ( id text primary key, title text, url text ); - Create a new table in Supabase (
- Tools for the LLM:
- Tool 1: List Documents: An n8n node that queries the
file_metadatatable to provide the LLM with a list of all available documents. This uses a standard PostgreSQL query. - Tool 2: Read Document: An n8n node that reads the full content of a specific document (by combining all its chunks) from the RAG based on the document ID. This allows the LLM to access the complete document if needed.
- Tool 3: Source Citation: When feeding the RAG, also store the
titleandURLof the document as metadata for each chunk. This allows the LLM to cite sources in its responses by providing the document name and a direct link.
- Tool 1: List Documents: An n8n node that queries the
- Update Document Ingestion for Metadata:
- After deleting old chunks and before chunking, use a Supabase node to
Insert or Updatethefile_metadatatable with theID_fichier,Titre_fichier, andURL_fichierfor the current document.
- After deleting old chunks and before chunking, use a Supabase node to
Benefit: This allows the AI agent to: * Identify the exact source document for its answers. * Provide links to original documents. * Access full documents for complex questions that might require broader context than individual chunks.
Step 6: Advanced RAG Part 3 - Reranking
Reranking drastically improves accuracy by reordering retrieved chunks based on their relevance to the user’s query.
Method:
- Increase Retrieval Limit: In your
Supabase Vector Storenode (within the RAG agent’s retrieval part), increase the number of retrieved chunks (e.g., to 20 instead of the initial 4). - Add a Reranker Node:
- In n8n, activate the
Rerank Resultsoption in yourVector Storenode. - Configure a reranker model. Co-here’s
Rerank v3.5is a popular choice for this. - Co-here Connection: Sign up for an account on Co.here, generate an API key (a trial key is available for testing), and create an n8n credential for it.
- Set the
Top Kvalue (e.g., 4) in the reranker to specify how many of the top-ranked chunks should be passed to the LLM.
- In n8n, activate the
Benefit: By retrieving a larger set of potentially relevant chunks and then intelligently reranking them, the LLM receives the most pertinent information. This reduces the error rate from 3.7% to an impressive 1.9%.
Conclusion
By meticulously following these steps, you can build a robust and highly accurate RAG system in n8n. Starting with a basic setup and progressively adding contextual embeddings, tools for broader document access, and reranking, you empower your AI agent with a sophisticated understanding of your knowledge base, leading to expert-level responses and significantly reduced error rates. While this guide focuses on Google Docs, the principles can be extended to other document types like PDFs, CSVs, or Confluence pages. For even more advanced RAG (like graph-based RAG), further technical expertise and dedicated server setups are required, often moving beyond low-code solutions.
🔍 Discover Kaptan Data Solutions — your partner for medical-physics data science & QA!
We're a French startup dedicated to building innovative web applications for medical physics, and quality assurance (QA).
Our mission: provide hospitals, cancer centers and dosimetry labs with powerful, intuitive and compliant tools that streamline beam-data acquisition, analysis and reporting.
🌐 Explore all our medical-physics services and tech updates
💻 Test our ready-to-use QA dashboards online
Our expertise covers:
🔬 Patient-specific dosimetry and image QA (EPID, portal dosimetry)
📈 Statistical Process Control (SPC) & anomaly detection for beam data
🤖 Automated QA workflows with n8n + AI agents (predictive maintenance)
📑 DICOM-RT / HL7 compliant reporting and audit trails
Leveraging advanced Python analytics and n8n orchestration, we help physicists automate routine QA, detect drifts early and generate regulatory-ready PDFs in one click.
Ready to boost treatment quality and uptime? Let’s discuss your linac challenges and design a tailor-made solution!
Get in touch to discuss your specific requirements and discover how our tailor-made solutions can help you unlock the value of your data, make informed decisions, and boost operational performance!
Comments