Are you an aspiring tech blogger or technical writer, staring blankly at your screen, wondering where to begin your next automation or AI agent project, especially when a client is waiting? This guide will walk you through a proven method to create any AI automation from A to Z, even if you’re starting from scratch with no coding knowledge.
The Three-Step Method for AI Automation
Whether you’re building a simple automation, an AI-powered automation, or an entire AI agent, the process remains consistent:
- Design and Schematic Creation: Clarify your ideas by drawing a diagram. This helps visualize the entire process, from input to output, and identify the components needed.
- Testing and Research: Experiment with unfamiliar components, APIs, or tools. This step is crucial for understanding how different parts of your automation will interact and selecting the best options based on performance, cost, and reliability.
- Construction: Only after thorough design and testing should you begin building. This iterative approach minimizes errors and ensures a robust solution.
This method applies whether you’re using no-code tools like n8n or Make, or diving into full-scale development. Developers follow a similar path: diagramming, testing unknown elements, and then building.
Practical Example: Automating Scanned Invoice Data Extraction
Let’s apply this method to a common business need: extracting data from scanned invoices. The client’s request is to build an AI agent that analyzes scanned invoices and automatically extracts the VAT-inclusive amount, date, and supplier name.
A Crucial Clarification on AI Agents: Many immediately jump to “AI agent,” but it’s important to understand the distinction. Simple automations often don’t require AI. Many business processes can be streamlined with basic automation. Even when AI is involved, it might just be an AI-powered automation, not a full-fledged agent. AI agents are typically needed for more complex, dynamic tasks involving multiple tools and decision-making. Don’t over-engineer; simpler is often better.
Step 1: Design and Schematic Creation
Start by mapping out the process, from left (inputs) to right (outputs).
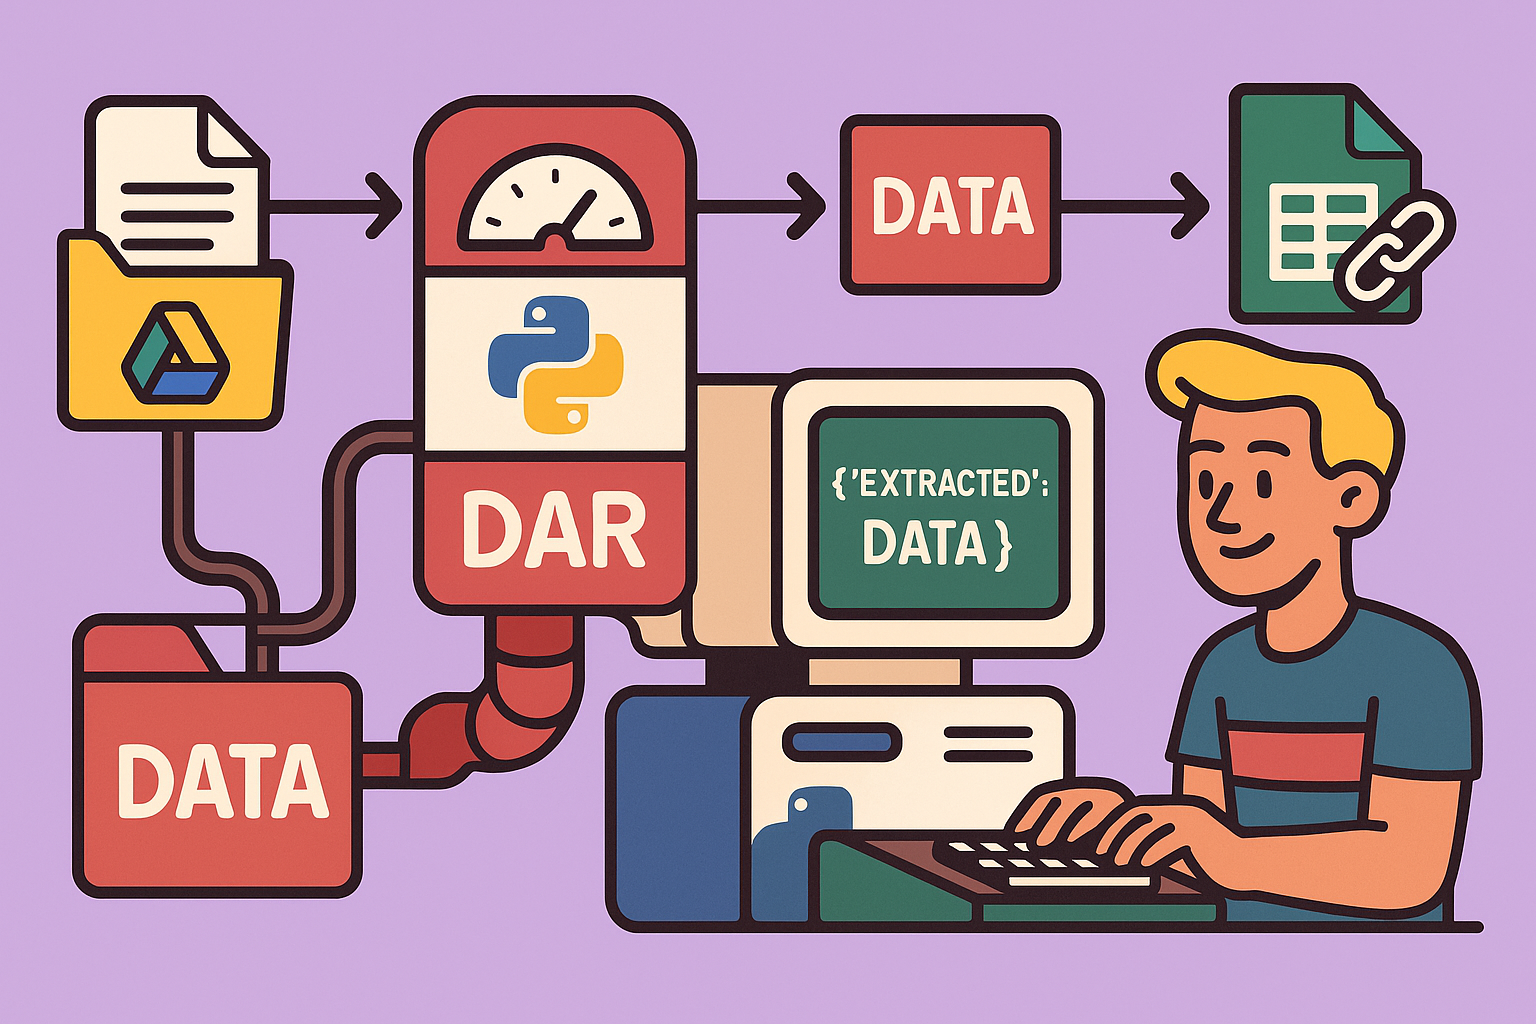
Inputs: The client provides scanned invoices, likely in PDF format, deposited into a Google Drive folder. This means the input will be scanned PDFs from Google Drive.
Outputs: The client wants to retrieve the amount (VAT-inclusive), date, and supplier. The crucial question is: where do they want this information? For this example, let’s assume they want it stored in a Google Sheet, alongside a link to the original PDF.
Mid-Process Components (the “black box”): Given scanned PDFs, direct data extraction is difficult. They first need to be converted into readable text. This involves:
- OCR (Optical Character Recognition): A tool to convert the scanned image of text into actual, editable text.
- LLM (Large Language Model): Since invoice layouts vary widely, a deterministic approach (e.g., searching for fixed text patterns) won’t work. An LLM is required to intelligently extract the specific information (amount, date, supplier) from the OCR-generated text.
- Google Sheet Integration: To store the extracted data and the PDF link.
So, the high-level workflow is: Google Drive (scanned PDF) -> OCR -> LLM (extraction) -> Google Sheets (storage).
Step 2: Testing and Research Unfamiliar Components
Assume you’re familiar with Google Drive and Google Sheets integrations, and interacting with LLMs. The unknown here is the OCR component for scanned PDFs.
Researching OCR Tools: You can use tools like ChatGPT or Google to look for available OCR solutions. Key considerations during research include:
- Data Quality: How accurate is the OCR output?
- Cost: Is it within budget for your client?
- API Documentation: Is it easy to integrate?
For this example, we’ll try Mistral OCR, a powerful OCR service known for its quality.
Testing Mistral OCR with n8n:
- Create a Sample PDF: Take a picture of an invoice with your phone or use a scanned PDF and upload it to a Google Drive folder.
- Make the PDF Accessible: In Google Drive, share the PDF and set access to “Anyone with the link” (read-only). To get a direct download link suitable for APIs, modify the sharing URL from
https://drive.google.com/file/d/DOC_ID/view?usp=sharingtohttps://drive.google.com/uc?id=DOC_ID. - Set Up n8n:
- Open a new n8n workflow.
- Add an HTTP Request node.
- In the HTTP Request node, use the “Import” feature and paste the cURL command for Mistral OCR’s API (found in their documentation for “OCR with PDF file from a URL”).
- Authentication: Obtain an API key from your Mistral AI platform account (create one if you don’t have it, choosing a free plan if available). In n8n, set up a credential for Mistral API to securely store your key, then link it to the HTTP Request node.
- Configure Request Body: Replace the placeholder
pdf_urlwith your direct Google Drive PDF download link. - Execute the Node: Run the HTTP request.
- Analyze Results: Inspect the JSON output from Mistral OCR. It should contain the extracted text from your scanned invoice. Verify that dates, amounts (e.g., VAT-inclusive totals), and supplier names are accurately recognized. This initial test confirms the OCR component works.
Step 3: Constructing the Automation Step-by-Step
Now that the core components are tested, build the full workflow.
1. Trigger the Automation
- Decide on Frequency: For invoice processing, a daily trigger (e.g., at midnight) might be suitable to process all invoices uploaded during the day, rather than per-file or every 15 minutes.
- Add a Schedule Trigger: In n8n, use the “Schedule Trigger” node to run the workflow once a day.
2. Retrieve PDFs from Google Drive
- Google Drive Node: Add a “Google Drive” node.
- Action: Select “Find files and folders.”
- Folder Filter: Specify the Google Drive folder where invoices are uploaded (e.g., “demo”).
- File Type: Filter for “Files.”
- Handling Processed Files: To avoid re-processing, create a new Google Drive folder (e.g., “processed”) and move files there after extraction. This prevents the automation from picking them up again on subsequent runs.
3. Download PDF into n8n
- Google Drive Node: Add another “Google Drive” node.
- Action: Select “Download file.”
- File ID: Use the file ID output from the previous “Find files and folders” node. This downloads the file into n8n’s temporary memory for further processing.
- Pin Results: After successfully downloading, “pin” the output of this node in n8n. This saves the result, allowing faster testing of subsequent nodes without re-downloading the file repeatedly.
4. Upload PDF to Mistral OCR
- HTTP Request Node: Add an “HTTP Request” node.
- Import cURL: Use the cURL command from Mistral’s documentation for uploading a file (not from a URL).
- Authentication: Configure with your Mistral API credentials.
- File Input: In the request body, specify the binary field that contains the downloaded PDF (typically named
databy default from the previous download node in n8n). This sends the PDF file directly to Mistral for processing.
5. Get File URL from Mistral
- Mistral’s API requires you to first upload a file and then request its URL to be used in the OCR processing step.
- HTTP Request Node: Add another “HTTP Request” node.
- URL: Construct the URL to retrieve the file’s URL from Mistral using the file ID returned from the previous upload step.
- Authentication: Use your Mistral API credentials.
- Execute and Pin: Run and pin the output, which will be the URL of the file stored on Mistral’s servers.
6. Perform OCR with Mistral
- HTTP Request Node: Add the final “HTTP Request” node for OCR.
- Import cURL: Use the cURL command for performing OCR on a file using its URL.
- Authentication: Use your Mistral API credentials.
- Request Body: Pass the URL obtained in the previous step.
- Response Handling: By default, Mistral might return a file. To get a JSON output directly, remove any
responseTypeparameters from the request body. This provides cleaner data for the LLM. - Execute and Pin: Run and pin the output. This output contains the OCR-extracted text in JSON format.
7. Extract Data with an LLM
- AI Node (Basic LLM Chain): Add an “AI” node and select “Basic LLM Chain.”
- Prompt Engineering: This is critical.
- System Prompt: Define the LLM’s role. Example: “You are an assistant specialized in extracting data from invoices. Your task is to analyze the OCR text of a scanned invoice and precisely extract specific information.”
- User Prompt: Provide instructions for extraction. Use a large text editor within n8n’s expression mode for clarity.
- Required Information: “Extract the invoice date, VAT-inclusive amount, and supplier name.”
- Format: “Return the three pieces of information in JSON format.”
- Specific Instructions:
- “If information is not found, return
null.” - “For the date, normalize to YYYY-MM-DD format.”
- “For the amount, return only the number without currency, using a dot as a decimal separator.”
- “For the supplier name, return the full company name, usually found at the top of the invoice header. Prioritize public organizations or known services; ignore legal mentions.”
- “Return only JSON, without any explanatory text.”
- “If information is not found, return
- Example (Few-Shot Learning): Include
Example Input OCR:followed by a sample OCR text, andExample Output JSON:followed by the expected JSON format. This significantly improves LLM accuracy.
- LLM Model: Choose a suitable model (e.g., GPT-4 mini via OpenRouter for better rate limits and cost control). OpenRouter acts as an intermediary, offering flexible access to various LLMs.
- Output Format Validation: Use the “Require specific output format” option.
- Structure Output Parser: Paste your expected JSON structure.
- Autofix Format: Enable this. If the LLM generates an incorrectly formatted JSON, n8n will ask another LLM to fix it, preventing workflow failure.
- Test and Refine: Run the LLM node with various sample invoices (5-10 diverse examples) and refine your prompt until the extraction is accurate and consistent. This iterative testing is key to robust LLM performance.
8. Store Data in Google Sheets
- Google Sheets Node: Add a “Google Sheets” node.
- Action: Select “Append Row.”
- Authentication: Use your existing Google Drive/Sheets connection.
- Spreadsheet: Select your designated invoice summary spreadsheet.
- Sheet: Choose the specific sheet (e.g., “Sheet1”).
- Map Data: Drag and drop the extracted date, amount, and supplier name from the LLM node’s output to the corresponding Google Sheets columns.
- PDF Link: Construct the shareable Google Drive link from the original file ID and paste it into the “URL” column of your Google Sheet.
- Execute and Pin: Run the node to verify data is correctly entered into the Google Sheet.
9. Move Processed File
- Google Drive Node: Add a final “Google Drive” node.
- Action: Select “Move file.”
- File ID: Use the file ID of the original PDF.
- Destination Folder: Select the “processed” folder created earlier.
10. End-to-End Testing
- Unpin All Nodes: Make sure all previously pinned nodes are unpinned.
- Place Multiple Files: Put a few new, untried invoices into your “demo” Google Drive folder.
- Run the Entire Workflow: Execute the complete automation from the schedule trigger.
- Verify: Check your Google Sheet for extracted data and the “processed” folder in Google Drive for moved files.
- Iterate: If any issues arise, debug and adjust your nodes or prompts, then re-test.
This comprehensive, step-by-step approach ensures that your AI automation is well-designed, thoroughly tested, and resilient, even for complex tasks like invoice data extraction.
🔍 Discover Kaptan Data Solutions — your partner for medical-physics data science & QA!
We're a French startup dedicated to building innovative web applications for medical physics, and quality assurance (QA).
Our mission: provide hospitals, cancer centers and dosimetry labs with powerful, intuitive and compliant tools that streamline beam-data acquisition, analysis and reporting.
🌐 Explore all our medical-physics services and tech updates
💻 Test our ready-to-use QA dashboards online
Our expertise covers:
🔬 Patient-specific dosimetry and image QA (EPID, portal dosimetry)
📈 Statistical Process Control (SPC) & anomaly detection for beam data
🤖 Automated QA workflows with n8n + AI agents (predictive maintenance)
📑 DICOM-RT / HL7 compliant reporting and audit trails
Leveraging advanced Python analytics and n8n orchestration, we help physicists automate routine QA, detect drifts early and generate regulatory-ready PDFs in one click.
Ready to boost treatment quality and uptime? Let’s discuss your linac challenges and design a tailor-made solution!
Get in touch to discuss your specific requirements and discover how our tailor-made solutions can help you unlock the value of your data, make informed decisions, and boost operational performance!
Comments