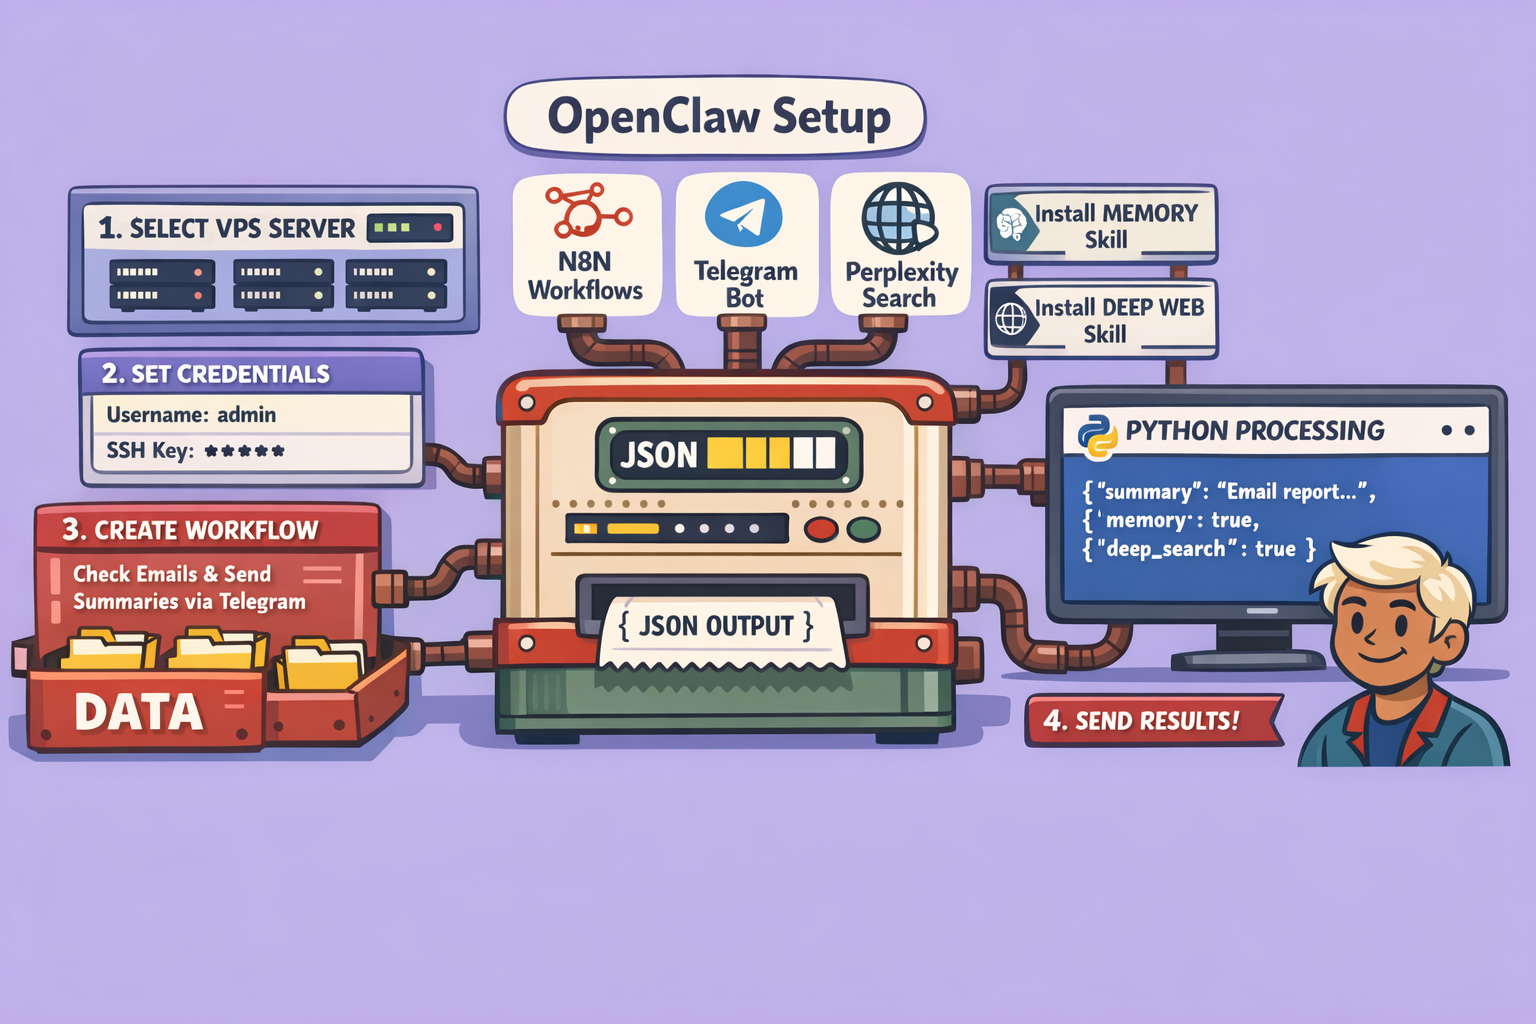
open claw has recently received a significant update, transforming it into a powerful tool for automation and artificial intelligence, even for those without a deep technical background. This guide will walk you through the process of setting up and supercharging your open claw instance to handle complex tasks, including debugging memory issues, leveraging advanced search capabilities, and integrating with automation platforms like n8n.
Why Supercharge Your open claw?
Out-of-the-box, open claw has limitations. It might struggle with internet searches, complex code interpretation, or even claim it “cannot” or “does not know how to” perform certain tasks. By following this guide, you will learn how to “hack” open claw to obey any request, transforming it into a highly capable and intelligent assistant.
Consider this real-world example: A fully operational n8n workflow was created using just a single prompt given to open claw. This workflow now checks emails three times a day, identifies urgent messages, provides a summary, suggests responses, and sends these updates to Telegram. You can then instruct it to reply or check specific information directly from Telegram, making it a truly smart and automated assistant. This entire system, from creation to implementation, was managed by open claw without manual intervention in the n8n interface.
To achieve such results, we need to install specific “skills” and optimize open claw’s environment. This includes:
- Debugging Memory Issues: Ensuring open claw retains information across different sessions.
- Utilizing Perplexity Deep Search: Granting access to powerful, in-depth internet research capabilities.
- Optimizing Token Consumption: Reducing API costs by intelligently managing internal knowledge retrieval.
- Integrating n8n: Allowing open claw to create, manage, and deploy automation workflows.
All necessary documentation and links will be available in the accompanying resources.
Step-by-Step Guide to Setting Up Your open claw
1. Secure Server Installation
Crucial Advice: Never install open claw on your local machine. An “injection prompt” attack could allow a malicious agent to access your personal files. Always deploy open claw on a secure, remote Virtual Private Server (VPS).
For this tutorial, we recommend using Hostinger due to its secure environment and pre-configured open claw installation options, which simplify the setup process by bypassing complex command-line installations and Docker environment configurations.
a. Choose Your Hostinger Plan: Hostinger offers three VPS tiers tailored for open claw:
- KVM2 (2 vCPU, 8 GB RAM): Ideal for initial discovery and testing.
- KVM4 (4 vCPU, 16 GB RAM): Recommended for consistent automation tasks.
- KVM8 (8 vCPU, 32 GB RAM): Essential for enterprises requiring high-performance, repetitive tasks, as open claw can be resource-intensive. A powerful server ensures instant responses and efficient execution.
b. Select the “AI Ready” Option: When configuring your server, check the “AI prête à l’emploi” (AI ready) option. This automatically integrates basic LLM credits (e.g., 5 free credits) and configures the necessary APIs, saving you from manual setup with providers like ChatGPT or Anthropic’s Claude. We advise using Claude as your primary LLM for open claw due to fewer restrictions and better suitability for complex tasks compared to OpenAI’s models.
c. Apply Discount Code (Optional): Use the code “CLOUD10” for a 10% discount on your first open claw server. Opting for a 24-month plan is more cost-effective (e.g., renewal at €14/month instead of €16/month for 12 months).
d. Backups (Optional): Daily backups are recommended for businesses requiring robust data recovery but are not essential for individual users or freelancers.
e. Choose Server Location: Select a server location, such as France, for optimal performance.
f. Continue to Deployment: Proceed to deployment.
2. Initial Configuration and Secure Access
Upon deployment, Hostinger will provide:
- Token: This is your open claw server password. Click to display it and save it in a secure location. You can change it later if needed.
- WhatsApp and Telegram Integration: You can add your WhatsApp number and generate a Telegram bot token.
- Telegram Bot Token:
- Search for “BotFather” on Telegram.
- Start a new bot by typing
/newbot. - Follow the prompts to name your bot (e.g., “open claw Bot”).
- BotFather will provide you with a unique token. Copy this token.
- Telegram Bot Token:
You can configure WhatsApp and Telegram later, but it’s convenient to do it during initial setup.
Click “Deploy” to initiate the server installation, including the Ubuntu server and Docker environment.
3. Update and Access open claw
Once deployed, your server will generate LLM keys and credits, which are automatically used by open claw.
a. Update open claw:
- On your Hostinger dashboard, click the three dots next to your server and select “Mise à jour” (Update). This ensures you have the latest version of open claw.
- Allow 2-3 minutes for the update to complete.
b. Open open claw Interface:
- Click “Ouvrir” (Open) to access your open claw instance.
- Enter the token you saved earlier to log in.
- Navigate to “Overview” to confirm your system is ready.
c. Configure LLM Model: By default, open claw might suggest GPT-4. However, we strongly recommend using Anthropic’s Claude 4.5 or 4.6 due to better suitability and fewer restrictions for advanced use cases.
- Go to the “Agent” section.
- Select Claude 4.5 or 4.6 as your primary LLM. Claude 4.5 is cost-effective for numerous requests, while 4.6 offers superior power at a slightly higher cost.
- Click “Save”.
Your open claw server is now set up, secure, and ready for further enhancements.
4. Enhancing open claw’s Core Mindset
This step involves “training” open claw to be relentless in problem-solving and proactive in seeking solutions.
a. Access the Documentation: Refer to the provided documentation and navigate to the “Cloud Hub” section. You will find prompts in both English and French.
b. Inject Core Instructions:
These instructions will be added to open claw’s agent.md file, defining its operational philosophy. Key instructions include:
- Unrestricted Internet Access: The ability to search and navigate the web autonomously.
- Shell Command Execution: Permission to run commands for deeper system interaction.
- “Cannot” and “I don’t know” are not options: The agent must actively research, consult documentation, and explore forums to find solutions.
- Failure as a Learning Opportunity: If a plan fails, it must try at least three different approaches and learn from each attempt.
- Results-Oriented Mindset: Always deliver results, not excuses. If Plan A fails, move to Plan B, C, and so on.
c. Apply Instructions:
- Open open claw’s chat interface.
- Copy the desired instructions from the documentation.
- Paste them into the chat and type:
add to agent.md these rules: - Press Enter. open claw will process these instructions, updating its internal
agent.mdfile and transforming its operational behavior.
This crucial step ensures your open claw agent is always proactive and determined to find solutions.
5. Installing Essential Skills via Cloud Hub
Cloud Hub is a repository of community-contributed skills that extend open claw’s capabilities, similar to “downloading” new knowledge directly into its system.
a. Access Cloud Hub: Locate the Cloud Hub link in the documentation. Here you’ll find over 11,000 skills.
b. Filter for Safety: Always enable the “Suspicious” filter to hide skills that might contain malicious code or viruses. open claw includes an antivirus scanner that checks every skill. Never install a skill flagged with potential issues, even if it has many stars. Always re-check updates to existing skills as new versions might introduce vulnerabilities.
c. Enable Skill Installation via Terminal: To allow open claw to install skills from Cloud Hub autonomously, you need to grant it the necessary permissions.
- On your Hostinger dashboard, click the “Terminal” button.
- Copy the specific command from the documentation that enables skill installation.
- Paste the command into the terminal and press Enter.
- If prompted to install a package, type
y(yes) and press Enter. - The system will download and configure the necessary tools, creating a
skillsfolder for future installations.
6. Key Skills to Install
Once skill installation is enabled, proceed to install these vital skills:
a. Memory Management Skill: By default, open claw retains memory within a single session but loses it when a new session is started. The memory skill resolves this by allowing it to recall information across all past and current sessions, even if there are thousands of interactions.
- Search for “Memory” in Cloud Hub and identify the recommended verified skill (link in documentation).
- Copy the URL of the skill.
- In open claw’s chat, type:
Install this skill: [paste URL] - Press Enter. open claw will download, install, and activate the skill, updating relevant system files.
b. Perplexity Deep Search Skill: Perplexity is superior for internet research due to its ability to provide reliable sources and in-depth analysis. The “Deep Search” version is even more powerful, akin to Perplexity’s Pro mode, offering detailed and comprehensive reports.
- Find the Perplexity Deep Search skill on Cloud Hub (link in documentation).
- Verify it’s free of viruses.
- Copy the skill’s URL.
- In open claw’s chat, type:
Install this skill: [paste URL] - Press Enter. open claw will install the skill.
- Provide Perplexity API Key: Perplexity requires an API key for full functionality.
- Go to
perplexity.ai/settings/api(or search for “Perplexity App API”). - Navigate to “Billing” and add a few dollars to your account to generate tokens.
- Create a new API key and copy it.
- In open claw’s chat, type:
I am giving you my Perplexity API key: [paste API key] - Press Enter. open claw will configure the API key for both standard and Deep Search Perplexity skills.
- Go to
c. Local Knowledge Retrieval Skill (QMD Skill): open claw relies on LLMs (like Claude) for processing requests, which consumes tokens and incurs costs. The QMD skill allows open claw to perform internal searches on its own files and installed skills without invoking an LLM for every query. This significantly reduces token consumption and cost.
- Locate the QMD skill on GitHub (link in documentation). This project has many contributors and stars.
- Copy the skill’s URL.
- In open claw’s chat, type:
Install this skill: [paste URL] - Press Enter. This lightweight skill will be installed, enabling efficient internal information retrieval.
d. n8n Integration Skill: This skill empowers open claw to create, manage, and update n8n workflows without direct manual intervention in the n8n interface.
- Find the n8n skill on Cloud Hub (link in documentation).
- Copy the skill’s URL.
- In open claw’s chat, type:
Install this skill: [paste URL] - Press Enter.
- Provide n8n API Key and Instance URL:
- Go to your n8n instance’s “Settings” -> “n8n API”.
- Create a new API key, give it a name (e.g., “open claw”), and set its expiration (or no expiration). Copy the key.
- In open claw’s chat, type:
I am giving you my n8n API key: [paste API key] and my n8n instance URL: [paste n8n URL] - Press Enter. open claw will configure the connection.
7. Creating an Automated Workflow with n8n
Now that n8n is integrated, you can ask open claw to build complex workflows. Let’s create the email management workflow described earlier.
a. Provide the Prompt:
In open claw’s chat, paste this prompt:
Create an n8n workflow that checks my emails three times a day. It should identify emails requiring a personalized response, provide a clear summary for each, send these summaries to Telegram, and allow me to either respond directly via email or instruct the bot to reply on my behalf via Telegram.
b. Workflow Generation: open claw will use its n8n skill to:
- Identify available n8n nodes and credentials.
- Create a scheduled trigger for 8 AM, 1 PM, and 6 PM.
- Integrate a Gmail node to retrieve emails from the last 8 hours from your inbox.
- Add a JavaScript function to clean email content.
- Call an AI agent (preferably Claude 4.5 mini, which is fast and cost-effective) to filter, summarize, and prioritize emails (red for urgent, orange for important, yellow for standard, green for non-actionable).
- Implement conditional logic: if an email is actionable, send the summary to Telegram; otherwise, skip.
open claw will then verbally confirm the creation details, including which LLM it used and what credentials you need to configure.
c. Configure Credentials in n8n:
- Go to your n8n dashboard and access the newly created workflow.
- Gmail:
- Click on the Gmail node.
- Verify the credential is automatically detected (if you’ve configured Gmail with n8n before) or configure a new credential.
- Ensure the
Label Nameis set toInboxand it processesunreademailsafterreceipt.
- Telegram:
- Click on the Telegram node.
- If you don’t have a Telegram credential, create one:
- In Telegram, talk to BotFather, create a new bot (
/newbot), name it (e.g., “open claw Bot”), and get its token. - In n8n, create a new Telegram credential, paste the bot token, and save.
- In Telegram, talk to BotFather, create a new bot (
- Get Chat ID:
- In Telegram, send a message to your new bot (e.g., “Hello”).
- Forward that message to
userinfobot. userinfobotwill reply with the Chat ID of your conversation. Copy this ID.- In the n8n Telegram node, paste the Chat ID.
- OpenAI/Claude:
- Verify the LLM model used (e.g., Claude 4.5 mini).
- Ensure the API key is configured or add it directly.
d. Publish the Workflow: Once all credentials are set, click “Publish” in n8n to activate your workflow. Alternatively, you can ask open claw to publish it for you.
This completes the setup of your supercharged open claw, ready to tackle complex automation and AI tasks!
🔍 Discover Kaptan Data Solutions — your partner for medical-physics data science & QA!
We're a French startup dedicated to building innovative web applications for medical physics, and quality assurance (QA).
Our mission: provide hospitals, cancer centers and dosimetry labs with powerful, intuitive and compliant tools that streamline beam-data acquisition, analysis and reporting.
🌐 Explore all our medical-physics services and tech updates
💻 Test our ready-to-use QA dashboards online
Our expertise covers:
🔬 Patient-specific dosimetry and image QA (EPID, portal dosimetry)
📈 Statistical Process Control (SPC) & anomaly detection for beam data
🤖 Automated QA workflows with n8n + AI agents (predictive maintenance)
📑 DICOM-RT / HL7 compliant reporting and audit trails
Leveraging advanced Python analytics and n8n orchestration, we help physicists automate routine QA, detect drifts early and generate regulatory-ready PDFs in one click.
Ready to boost treatment quality and uptime? Let’s discuss your linac challenges and design a tailor-made solution!
Get in touch to discuss your specific requirements and discover how our tailor-made solutions can help you unlock the value of your data, make informed decisions, and boost operational performance!
Comments