This article delves into the world of Eclipse Scripting API (ESAPI), a powerful tool designed to automate and enhance various aspects of medical physics. We’ll explore what ESAPI is, why medical physicists should embrace coding, how to utilize the API, and even touch upon the revolutionary role of AI in simplifying the process.
The Essence of Coding: Talking to Computers
At its core, coding is about communicating with computers in a language they understand. Unlike human languages, computers understand machine language, a series of binary zeros and ones. High-level languages like Python, C#, and Java act as intermediaries, providing a structured way to express instructions. These instructions are then converted into machine language by compilers or interpreters.
Eclipse, for instance, primarily uses C# and relies on compilers to transform code into executable files. While Python has gained popularity, C# often offers better performance within the Eclipse environment, especially for tasks involving extensive loops, due to Eclipse’s historical design.
Why Should Medical Physicists Code?
The question isn’t whether a medical physicist can code, but why they should. The answer lies in the unique blend of domain-specific knowledge and the ability to automate complex, repetitive tasks. Medical physicists understand the intricacies of dose information, QA procedures, and physics parameters in a way that an IT professional simply cannot. By coding, physicists can:
- Simplify and Automate Manual Work: Transform tedious, error-prone manual processes into efficient automated workflows.
- Reduce Errors: Automation inherently minimizes the risk of human error in critical calculations and procedures.
- Improve Patient Care: Ultimately, these efficiencies lead to more accurate treatments, better quality assurance, and enhanced patient safety.
Understanding ESAPI: Your Gateway to Eclipse Automation
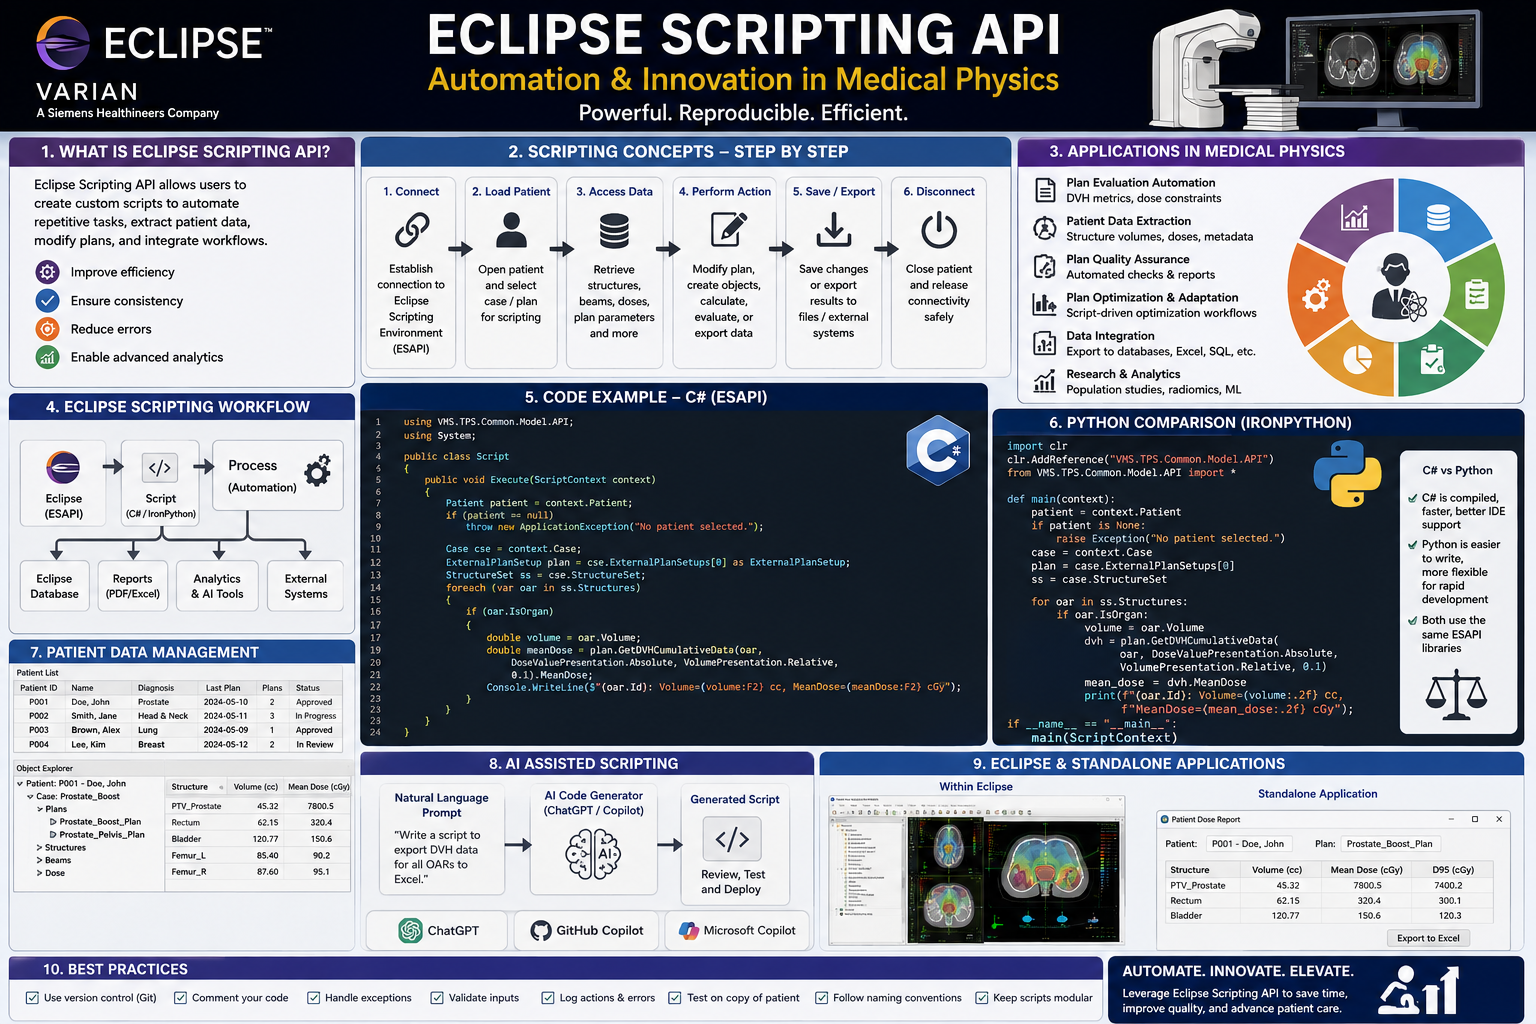
ESAPI, or Eclipse Scripting Application Programming Interface, is a set of pre-defined functions and procedures that allow external applications or scripts to interact with Eclipse software. Imagine it as a bridge that enables your code to “talk” to Eclipse without needing to understand its internal, proprietary workings.
When you call an ESAPI function, such as open patient and provide an ID, Eclipse executes a complex sequence of actions in the background—accessing databases, retrieving patient information, and displaying it on your screen. As a user, you only see the result of that function call, not the underlying complexity.
ESAPI provides methods to:
- Read patient demographics (name, age, physician).
- Access and manipulate structures (contours, volumes, Boolean operations).
- Read calculated doses and DVH data (dose at volume, volume at dose).
- Retrieve beam parameters (gantry, couch angles).
- Access prescription details.
- Run and optimize dose calculations.
- Create reports and export data.
What ESAPI Cannot Do (and Why)
While powerful, ESAPI is an automation tool designed to assist, not replace, human oversight in clinical settings. Therefore, certain operations are restricted:
- Bypassing Approvals: Scripts cannot automatically approve treatment plans or push them to a linac. This requires manual verification by a qualified professional.
- Direct GUI Interaction: While scripts can generate graphical user interfaces (GUIs), they cannot directly control or simulate user interactions within the Eclipse application itself.
- Direct Database Access: Scripts can only access data through the provided API, not directly query Eclipse’s underlying database.
Types of ESAPI Scripts
ESAPI offers different script structures to cater to various needs:
- Single-File Plugin: Simple, contained scripts ideal for quick tasks and basic interactions within Eclipse. These are often used for read-only operations.
- Windows Plugin: These allow for more interactive user interfaces. You can design custom windows with dropdowns, text boxes, and buttons, providing a more user-friendly experience for selecting options or inputting data.
- Standalone Application: These are independent executable files that run outside the Eclipse GUI but leverage its backend functionalities. They can start by opening Eclipse in the background and performing operations, then saving changes. These are powerful for automating complex, multi-step workflows.
Anatomy of an ESAPI Script
Let’s break down the general structure and workflow of an ESAPI script:
- Context Establishment: All ESAPI interactions begin by establishing a “context.” This context represents the current state of Eclipse—for example, whether a patient is open, which plan is loaded, etc.
// Example: Opening a patient given an ID // If not in a modification mode, use 'Application.OpenPatientById()' or 'context.Patient' for read-only // If modifications are needed, use 'Application.CreateApplication().OpenPatientById(patientId).BeginModifications()' - Navigating the Data Hierarchy: Eclipse data is organized hierarchically:
Patient>Course>PlanSetup>StructureSet/Beam/DoseTo access specific data, you typically traverse this hierarchy in your code.// Example (simplified): Accessing patient and plan data var patient = context.Patient; foreach (var course in patient.Courses) { foreach (var planSetup in course.PlanSetups) { // Access plan details, beams, structures, etc. } } - Reading and Modifying Data:
- Reading: You can read patient demographics, structure contours, dose values, beam parameters, etc.
- Modifying (requires
BeginModifications): For operations that alter data (e.g., creating new structures, modifying contours, optimizing plans), you must explicitly run the script in “modification mode” by callingBeginModifications()andEndModifications()to save changes.
- Running Calculations and Optimizations: ESAPI allows you to trigger dose calculations and plan optimizations directly from your script. You can specify calculation models, optimization objectives, and then initiate the process.
Step-by-Step How-To: Reading Patient and Plan Data (Single-File Plugin)
This example demonstrates how to create a simple read-only single-file plugin to display patient and plan information.
Prerequisites:
- Eclipse TPS installed.
- Visual Studio (or similar IDE) for C# development.
- ESAPI libraries referenced in your Visual Studio project.
Steps:
- Set Up Your Project: Create a new C# Class Library project in Visual Studio.
- Add ESAPI References: Reference the necessary ESAPI DLLs (e.g.,
VMS.TPS.Common.Model.API.dll,VMS.TPS.Common.Model.Types.dll) from your Eclipse installation directory. -
Write the Code: Implement the
Executemethod logic within your script class.using System; using System.Linq; using System.Windows; using VMS.TPS.Common.Model.API; using VMS.TPS.Common.Model.Types; namespace YourNamespace { public class YourScript { public void Execute(ScriptContext context, Window window) { // Check if a patient is open if (context.Patient == null) { MessageBox.Show("Please open a patient first."); return; } // Get patient information var patient = context.Patient; string patientInfo = $"Patient ID: {patient.Id}\nPatient Name: {patient.Name}\n\n"; // Iterate through courses and plans patientInfo += "Courses and Plans:\n"; foreach (var course in patient.Courses) { patientInfo += $" Course ID: {course.Id}\n"; foreach (var planSetup in course.PlanSetups) { patientInfo += $" Plan ID: {planSetup.Id}\n"; if (planSetup.Prescription != null) { patientInfo += $" Prescribed Dose: {planSetup.Prescription.DosePerFraction.DisplayValue} {planSetup.Prescription.DosePerFraction.UnitString} x {planSetup.Prescription.NumberOfFractions} = {planSetup.Prescription.TotalDose.DisplayValue} {planSetup.Prescription.TotalDose.UnitString}\n"; } // Add more plan details as needed patientInfo += $" Number of Beams: {planSetup.Beams.Count()}\n"; patientInfo += $" Primary Physician: {planSetup.PrimaryDosePrescription.PrimaryPhysician}\n"; } } // Display the information in a message box MessageBox.Show(patientInfo, "Patient and Plan Details"); } } } - Build the Project: Compile your C# project to generate a DLL file.
- Deploy the Script: Place the compiled DLL in the designated ESAPI script folder within your Eclipse installation.
- Approve and Run:
- Open Eclipse.
- Go to
Tools>Script Administration. - Locate your script and approve it.
- Go to
Tools>Scriptsand select your script to run.
The Future of Coding: AI as Your Co-Pilot
For those new to coding or seeking to accelerate development, Artificial Intelligence (AI) tools like Claude, Gemini, or Code AI are game-changers.
How to Use AI for ESAPI Scripting:
- Formulate Clear Prompts: Be specific in your requests. For example: “Write a single-file, read-only C# ESAPI plugin for Eclipse TPS. It should retrieve the patient ID, patient name, and for each plan, display the plan ID, prescribed dose, and number of fractions. Ensure it uses standard ESAPI namespaces and handles cases where no patient is open.”
- Specify ESAPI Context: Always mention “ESAPI” and ideally the version you’re targeting, to help the AI generate more accurate code.
- Review and Validate: AI-generated code, while impressive, can sometimes contain “hallucinations” or logical errors. Always review the code carefully, test it thoroughly, and, for clinical use, have it validated by experienced colleagues.
AI acts as a powerful co-pilot, helping to generate boilerplate code, explore API functionalities, and even translate code between languages. This allows medical physicists to focus on the clinical logic and problem-solving, rather than getting bogged down in syntax.
A Roadmap for Aspiring Medical Physicist Coders
- C# Essentials: Start with the basics of C# (or Python if preferred). Understand variables, loops, conditional statements, and functions.
- Devish Readings: Explore how to read and interpret data specifically relevant to medical physics applications.
- Create a Plugin/Standalone App: Apply your knowledge to build a simple plugin or standalone application that addresses a specific need in your department.
- Collaborate and Share: Test your creations, share them with colleagues, and gather feedback.
- Leverage Resources:
- Varian Portal: The official source for ESAPI documentation and updates.
- GitHub Repositories: Numerous community-contributed ESAPI examples and solutions.
- Carlos Anderson’s Blog: Provides detailed explanations and insights into ESAPI functionalities.
Embracing coding and ESAPI empowers medical physicists to innovate, streamline workflows, and ultimately contribute to safer and more effective cancer treatments. With AI assisting in the process, the barrier to entry has never been lower.
🔍 Discover Kaptan Data Solutions — your partner for medical-physics data science & QA!
We're a French startup dedicated to building innovative web applications for medical physics, and quality assurance (QA).
Our mission: provide hospitals, cancer centers and dosimetry labs with powerful, intuitive and compliant tools that streamline beam-data acquisition, analysis and reporting.
🌐 Explore all our medical-physics services and tech updates
💻 Test our ready-to-use QA dashboards online
Our medical physics SaaS is coming soon — designed for radiation therapy, imaging, and nuclear medicine centers.
Our expertise covers:
🔬 Patient-specific dosimetry and image QA (EPID, portal dosimetry)
📈 Statistical Process Control (SPC) & anomaly detection for beam data
🤖 Automated QA workflows with n8n + AI agents (predictive maintenance)
📑 DICOM-RT / HL7 compliant reporting and audit trails
Leveraging advanced Python analytics and n8n orchestration, we help physicists automate routine QA, detect drifts early and generate regulatory-ready PDFs in one click.
Ready to boost treatment quality and uptime? Let’s discuss your linac challenges and design a tailor-made solution!
Get in touch to discuss your specific requirements and discover how our tailor-made solutions can help you unlock the value of your data, make informed decisions, and boost operational performance!
Comments